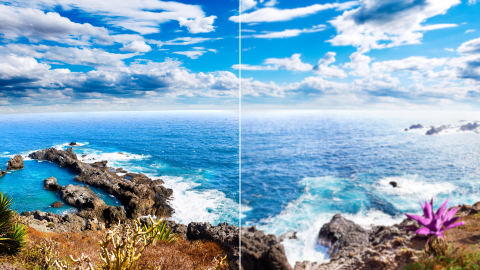
Say goodbye to blurry Images and unfocused Reels!
You checked the video on your phone, it looked clear as day, but when you posted it on Instagram the dreaded blurr took over!
Here are reasons why, and how to fix them.

- Most commonly, your resolution and aspect ratio are too low. (Not sure what these are? Check out the terms below.)
- Your ‘Data saving’ feature is turned on in Instagram Data settings.
- Your internet connection is poor.
- Your image is not in JPEG format.
Resolution: No, it’s not that thing you commit to on NYE then blow off in February. Resolution is the level of detail contained in an image or video, and refers to the number of pixels that exist within that image. The higher the pixel count, the more detail and definition you will see.
Aspect Ratio: The aspect ratio of a video or image is the ratio of its width to its height. It’s expressed with two numbers separated by a colon, such as 9:16.
JPEG: A type of file format for images, which has a high resolution with a smaller file size.

Here’s how to fix your blurry content!
1. Correcting Poor Resolution
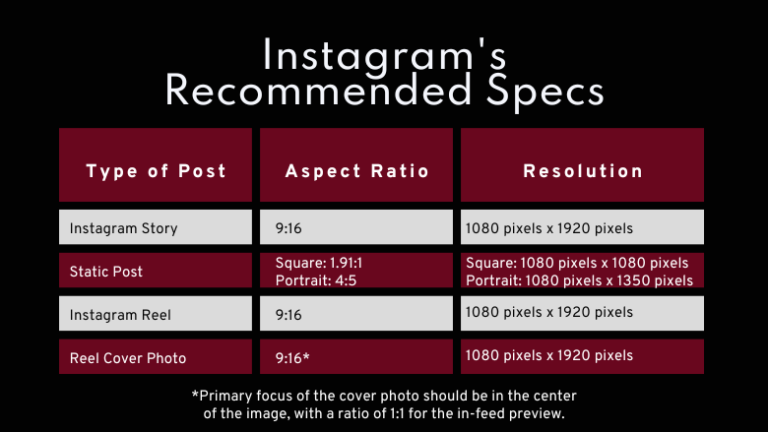
Instagram has minimum and maximum resolutions for all content on the app.
When a video or image with resolution below Instagram’s minimum is uploaded to the app, the content is stretched to fit the screen.
Similarly, if you upload a video larger than 4GB, or with a resolution higher than the maximum allowance, the app will automatically compress it down to the maximum allowance.
These reasons are why content can appear different once uploaded to the app than it did on your phone or computer prior to posting.
For best results, always follow the below specs guide before posting.

2. Instagram Data Setting
Instagram automatically tries to save you data, which is great if you have a limited plan or unreliable wifi. However, Data Saver mode can also affect the quality of your content being uploaded by compressing it into a smaller file size so that it requires less data to upload.
Here’s how to turn it off:
- Tap or your profile picture in the bottom right of the app to go to your profile.
- Tap the hamburger menu (three horizontal lines) in the top right of the screen, then tap Settings and Privacy.
- Tap Account, then tap Data usage.
- To upload at the highest quality, toggle off.
3. Fix That Connection
The stronger the connection, the better! If you have a poor wifi connection and your data signal is stronger, turn off your wifi for posting.
If both your wifi and data connection are poor, hold off on posting until you have a better connection.

4. Posting Images in JPEG
The default file format accepted by Instagram is JPEG (.jpg), which has a high resolution with a smaller file size. When you upload an image file in any other format, Instagram then converts the file to JPEG while uploading. During this conversion, the file loses its quality, so adjust your file format ahead of time to make sure you keep your resolution!
Watch how to change your file format on an iPhone!
 Now that you know how to keep your content crystal clear, it’s time to show off those pixels!
Tag us in your next post @SamuraiMediaOfficial so we can check you how clear your content is.

What Platforms To Best Market Yourself On and Your Brand: (Part 2)
Discover how to reach new audiences with your niche on Pinterest, YouTube, and LinkedIn!

What Platforms to Best Market Yourself on And Your Brand: (Part 1)
Let’s explore how you can make the most of your digital presence and reach your goals.

Decoding The Social Media Puzzle: Where To Post Content
You work hard on creating your content, and to get the best results from it, we want to make sure you are posting it to the social media platform that will have the most success. Find out more to receive all the knowledge!

